
 There is always too much email. When you sit down to read and act on the emails, it can feel like you are drowning and will never get your head above water. Fortunately, there are some ways to clean up your inbox and get it down to zero. Or if not zero, something more manageable.
Search
Gmail is created by Google. In my opinion, Google is the best search tool out there. And, the best part about Gmail is that it can be fully searched using Google's search engine.
You can search and find anything in your Gmail account by using the search box at the top of the Gmail page. And if you click on the little arrow at the right side of the search box, you will be able to do some pretty cool advanced searches, like search for emails that have specific words, have an attachment, or are within a specific date range. (You can also use search words instead of clicking on the arrow to get to the advanced search. Check out this PDF Gmail Search Cheat Sheet from Alice Keeler.) So go ahead, and file away those emails using labels or the archive tool, because you can easily search for your emails later.

Trash vs. Archive
 In a G Suite for Education account, you have UNLIMITED free storage. So there is no need to delete your emails. And, if you delete an email, it will permanently disappear in 30 days, so you won't be able to find it later. So instead of deleting your emails, ARCHIVE them. In Gmail, archive basically means taking your email out of your inbox. You can place it in a labeled "folder", or just click archive, and it will take it out of your inbox. You will then be able to find it by searching, looking in your "folders", or in your "All Mail". You can also archive multiple emails at once by clicking on the little check box at the top of your screen, then clicking on archive.
Labels
Gmail has "labels" instead of "folders". A folder system, like in many other email programs, only allows an email to be in one folder at a time. Gmail uses labels instead. One email can have multiple labels, and you can find that email by looking in the different "folders" with that label on the left of your screen. So use those labels to your advantage to organize your mail. And you can create filters which will automatically label (based on certain criteria) emails when you receive them, saving you some time.
- Check the box next to an email (or multiple emails).
- Click on the label icon.
- Check all the boxes of the labels you want for that email (or group of emails).
- Or, create a new label.
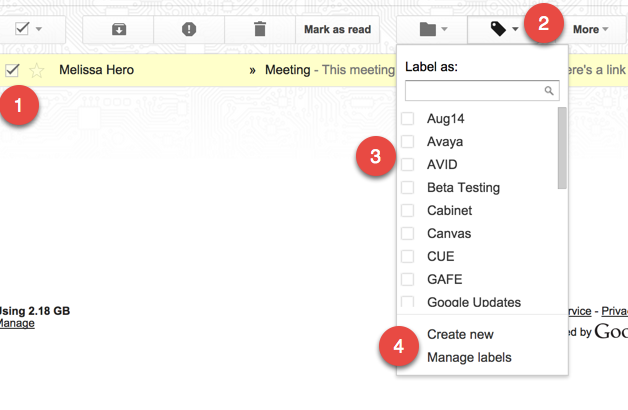
Note: When you add a label to an email, it does not automatically move the email out of your inbox. You must archive it. OR, you can click on the folder next to the label to move it. (But if you choose the folder, you can only move it to that one folder.)
Filters
Filters can automate actions for you. You can mark all emails with certain key words in the subject area, text, or from specific people as read, or have them skip your inbox, or be automatically marked with certain labels. Here are instructions on how to set this up.
Conversation View
The default view of emails is that they are grouped together in a conversation. So all emails and their replies are linked together in a thread. For example, if you send me an email, then I reply to it, and you send me another reply, all emails will show up as one conversation and take up one line in your inbox. This will help keep conversations together and you can easily see all communication regarding that topic in one place. When you are ready to archive a conversation, all emails in that thread will be archived. (If you had the emails separate, you would need to archive each email individually.) To make sure your emails are set to conversation view, go to the gear in the top right corner of your gmail. Choose settings. Scroll down, and turn Conversation View on.
Add Emails to your Calendar
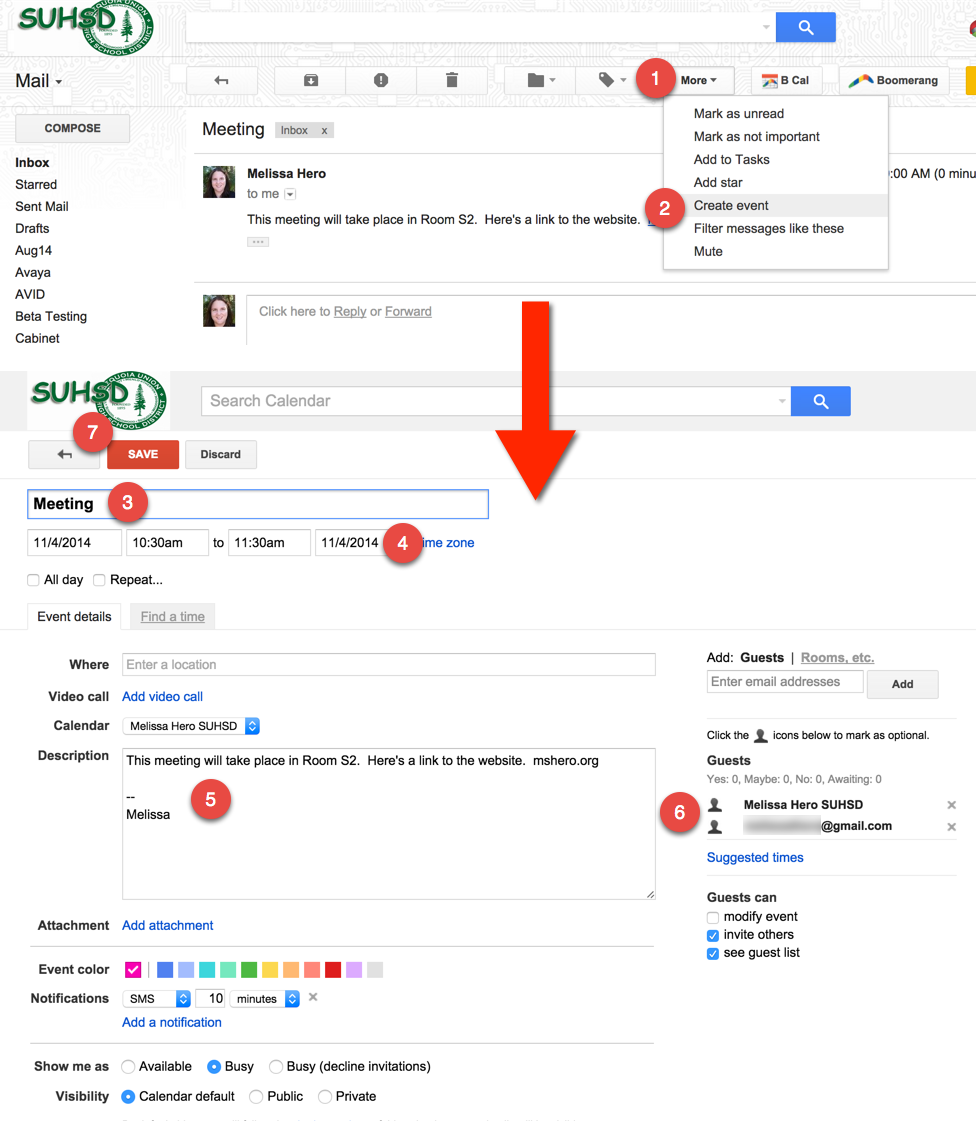 Many times I keep emails in my inbox because they relate to a meeting or event that is coming up. Gmail allows you to create an event from a gmail, and the text of that email will be added into the details of the event. Once I add an email to a calendar event, I can archive the email, and still find all of the relevant information in the details of the calendar event. To add an email to a calendar event, follow the steps below:
- Click on "More" at the top of the email.
- Choose "Create event".
- The title of the event will be the subject of the email. You can edit this.
- Set the correct date and time of the event.
- The description will include the text of the email. If the email was long, it may not include all of the text. Just go back to the email, and copy and paste the entire email into this box.
- The event will automatically include all people who the email was sent to as guests. When creating an event, you may want to delete the guests so they all don't get email invites.
- Press Save.
Create a Task from your Email
Sometimes an email doesn't represent an event that you want to place on your calendar, but it might be something you need to add to your to do list. You can add emails to your Google Task list, and a link to the email will be added to the task. Then you can go ahead and archive your email, because you'll be able to see it by clicking on the link in your task. Below are instructions on how to add an email to a task:

- Click on "More" above the email.
- Click "Add to Tasks".
- It will create a task and your task window will open at the bottom right of your screen. If you click on the arrow to the right of the task you can edit it and add a due date.
- You can change the name of the task. It defaults to the subject of the email.
- You can pick a due date.
- Add in notes.
- The link to the related email allows you to open the email that may contain info, links, etc.
- You will see the tasks in your Google calendar on the date the task is due. Make sure you turned on the "Tasks" calendar in your "My Calendar" list.
- When clicking on the task in your calendar, you will see the notes and can click on the related email link to go back to the email.
Hopefully these tips will help you get your inbox down to zero!
If you have any other tips or suggestions, please add it to the comments.


