Showing posts with label GAFE. Show all posts

Friday, November 6, 2015

Email Check In After Providing Professional Development

A few weeks ago, at Fall CUE, I attended Kevin Fairchild and Jessica Lura's session "Strategies for Teaching Adults".  I had participated in the Leading Edge Certification course for Professional Learning Leaders with them last spring and enjoyed learning with them.  I was excited to see that they were leading a session together at the conference.  

Their presentation was more of a discussion than a presentation, which promoted a lot of group conversations and sharing.  One of the things Kevin shared in the session really stuck with me, and inspired an idea.  When we were discussing how to know if our PD had an impact on the participants, and if they used what we taught them, Kevin shared a strategy that he has used.  Kevin sends out emails after the event, and then, if he remembers, another one a few months later.  

I normally send an email right after the PD, but never thought of sending one out later, to check in on the participant's progress.  I know I wouldn't consistently remember to send an email later in the year; I'd never be able to keep track of everything.  I thought that there had to be a way to automate that process.  I immediately began thinking of how I could use Google Forms and some Add-Ons, copyDown and formMule, to make this work.   

I just got a chance to try this out and set it up for the professional development I offer at my district.  In this post, I will describe how I set it up in case you want to use this for any PD you may offer.


Summary of Automation Process


  • First, I created a Google Form for participants to sign in when they attend a PD session.  It collects their name, email, and title of the session.
  • On the spreadsheet that is created from the form submissions, I added a few extra columns, with formulas.  
    • One column includes the date of a week after the PD, which has a formula that auto adds that up referencing the timestamp.
    • Another column that includes a date three months after the PD, with a formula to calculate that, referencing the timestamp.
    • And two more columns that reference those two dates I just created.  The formula in these columns looks at the previous column and if the date of the one week column equals today's date, it will write "TODAY" in the column, and if the date of the three month column equals today's date, it writes "TODAY" in that column.
  • Next, I ran the add-on copyDown to copy down these formulas into each row on form submission.
  • Finally, I used the add-on FormMule to run each morning.  It is triggered to send out one of two emails.  If the one week column says "TODAY", it will send the one week email thanking participants, sending them the link to our PD resources webpage, and asking if they need any support.  If the three month column says "TODAY", an email will be sent asking if they implemented what they learned and offering support if they need help.

Video Instructions

This video is about 20 minutes and walks you through the entire process to set up one week and three month check-in emails.  I am so sorry that it is this long, but you can jump ahead to the section you need, using the timeline if you open it up on YouTube, or on the table of contents "page" at the beginning of the video.


Spreadsheet Formulas and formMule HTML

Here are some of the formulas and HTML code I used, so you can copy and paste them into your own sheet.

Spreadsheet Formulas:
  • To convert the Timestamp (with date and time) to the date:  =to_date(int(A2))

  • 1 week reminder (7 days):  =B2+7  
  • Today:  =if(H2=today(),"TODAY","")

  • 3 month reminder (91 days):  =B2+91  
  • Today:  =if(J2=today(),"TODAY","")
(Where B2 = cell date, and H2 = cell that has the one week date (or J2 has the 3 month date formula).  Depending on what information you are collecting in your form, your column letters may change.)

HTML for FormMule:

  • HTML website link:  <a href="https://sites.google.com/a/seq.org/suhsdpd/">SUHSD PD Website</a>
  • HTML email link:  <a href="mailto:mhero@seq.org" target="_top">Melissa</a>

(What is in blue is what they will see in the email, and it will be hyperlinked to what is in red.)

Monday, November 2, 2015

Lesson Crashers: Psychology - Functions of the Brain

I wrote up this blog post for my district staff, but decided to share it on my personal blog too.  I am hoping to get more teachers to book appointments with me for instructional technology, rather than seeing me as just their tech support to help them with their gmail and gradebook.  I am hoping that by starting "Lesson Crashers" I will get more teachers interested in incorporating technology into their instruction.

________________________________________


I must admit, sometimes I watch a little too much TV, especially when I should be cleaning my house, preparing a lesson, etc.

But some TV can be a good thing - educators can get some great ideas for lessons based on TV shows.  There are hundreds of Jeopardy style review games and templates on the web.  The Exploratorium Teacher Institute runs an "Iron Science Teacher" web show each summer based on Iron Chef where teachers create science lessons using a secret "ingredient."  Jennifer Kloczko, an administrator from Natomas, got inspiration for the Professional Development she leads from Food Network's "Chopped."

Yard Crashers
This summer, I watched a lot of HGTV and one of my favorites was Yard Crashers.  The main premise of the show is that some home owners are shopping at a Home Depot type store, in the garden section, and the host sneaks up on them, volunteering to design and landscape their yard.  The show provides the designer, supplies, and a construction/landscaping crew, and the home owners pitch in too.

Lesson Crashers
This gave me the idea to create my own spin on the show called "Lesson Crashers."  The idea behind "Lesson Crashers" is that I would help a teacher reinvent a lesson, integrating technology.  I'd meet with the teacher, we'd discuss a lesson or project that they have used before, and figure out what new goals they have or hopes for improvement.  Working together, we'd then brainstorm some ideas on how we can meaningfully integrate technology to enhance the lesson.  When the teacher then teaches the lesson, I can provide support if needed (ex. coteach, observe, etc.).  Then, we'd debrief the lesson, and come up with next steps.

Here is the first Lesson Crasher lesson.  Michelle McKee, a psychology teacher at Carlmont, graciously volunteered to test this out with me, and we wrote up a description of the process.  I am hoping that this lesson will spark some ideas that you can use in your own classes.  

Tuesday, February 3, 2015

Leading Edge Certification: Online and Blended Teacher, Module 1.2 Reflection - Personal Learning Goal

I am currently taking the Leading Edge Certification course for Online and Blended Teacher.  For each of our assignments, we can either post our activities and reflections straight onto the course LMS, or we can add them to our blog (and then link that to the LMS).  I have been neglecting my personal blog this school year as all of my tech tips have been posted on a new district blog that I have created.  So I have chosen to post my course work for the Online and Blended Teacher course here to give my blog some attention and love.  :)


Module 1 is an introduction to Online and Blended Learning.  This is the first reflection.


PROMPT:  1.2 Reflection: Personal Learning Goal
 Considering the online learning self-assessment you took this week (page 7 of the online textbook), and thinking about your reasons for taking this course:
  • What is your highest priority learning goal for this course? 
  • What are some specific skills, strategies or tools you are hoping to learn more about?

In the 15 years I have been teaching (high school biology and AVID), I have always been near the forefront of using technology in my classes, at my school.  I was one of the firsts in my school to use an LCD project, get a SMART Board, use clickers with my students, allow my students to use their phones in class, etc.  The last two years in the classroom, I had a class set of iPads and flipped my instruction.  I feel that I taught a blended course, as direct instruction was mostly delivered through online content, but students worked together in person, in class.  I strived for giving my students a choice in their learning activities, differentiating instruction based on their learning needs, and providing support and guidance so that they can succeed. I feel that not all of my high school students are ready to be an online only learner, and would "fail" the online assessment from page 7. However, they could learn a lot in a blended course, taking advantages of the pros of online learner and face to face learning.

In the last few years, I have met some amazing educators at CUE conferences, EdCamps, GAFE Summits, and other workshops that I have attended, who have done things with their students that just blow my mind.  I love to learn what other educators are doing and improve my practice so that I can help all of my students succeed and excel.  I am also willing to try new things, but I am very thoughtful in what technology I use with my students.  I feel that it is extremely important that the technology is not used as just a fun tool to capture attention, but as a means to best meet the student learning objectives.  There is a time and a place for technology, and it doesn’t always fit in a lesson.

This year, I am out of the classroom, in a new role in my district, as a Instructional Technology Specialist.  So my students this year are high school teachers.  I am working with my district’s teachers one on one, providing after school workshops, and co-facilitating an online course using the LEC Digital Educator open source curriculum.  My job is to help teachers incorporate technology into their lessons, to enhance student learning.

I have many goals for taking this Leading Edge Certification course for the Online and Blended Teacher.  I want to find the best ways to teach other educators how to create a blended learning environment in their courses.  I also want to learn some tips and strategies to help me better facilitate the online course I am doing with the teachers, while modeling practices they could use with their high school students.  I have found that it is really easy to provide feedback and guidance on assignments to my high school students, but when a teacher, my peer, doesn’t follow directions on an assignment, I have a harder time providing feedback.  It is so awkward to have to tell a teacher, sometimes a few times, to make sure they answer all parts of a prompt.  

By taking this course, I also am looking forward to collaborating and learning from and with other educators from around the state.  I have taken another Leading Edge Certification course and know that it will help me grow as an educator.

Sunday, September 14, 2014

New Position and New Helpful Calendar Tools

This school year I have started a new adventure.  After teaching at Carlmont High School for the last twelve years, I am now our districts new Instructional Technology Specialist.  I spend one day a week at each of the district schools helping teachers integrate technology into their curriculum.

People keep asking me if I miss being in the classroom.  Honestly, after four weeks, I am still not sure.  I miss my AVID students.  I left them after their sophomore year.  And I missing talking with my students and having them hang out in my classroom at lunch.  But there are some things that I definitely don't miss - grading, spending hours setting up biology labs, and getting emails about grades. 

Also, I have had to get used to traveling around to different schools, learning all the different bell schedules, finding my way across new campuses and learning names to so many different people.  

So far, most of what I have been doing is helping teachers and other staff get to know two new programs our district has adopted - School Loop and GAFE.  It feels great to see teachers excited about what these tools can do, but I can't wait to start helping teachers actually plan lessons and integrate technology into their classes for students to use.  We have so many great teachers in our district, and I look forward to working with them and their students.

In this new position, I have found that I rely on my Google calendar immensely.   Last week I had appointments with twenty different teachers, and that doesn't include the meetings I had at the district office.  I have found two tools that work with my Google calendar that have saved my sanity.  One is Schedule Once, and the other is the Google calendar text notifications.

The first few weeks of this position, teachers were emailing me asking to meet, but they didn't tell me what school they were at, or would ask to meet fourth period, but forget to tell me that they had an assembly schedule that day.  I ended up spending a ton of time emailing back and forth to set up meetings.  I started to explore different ways to book appointments - GAFE's appt slots (not great for varied schedules), youcanbook.me (didn't put the calendar event on the appt. booker's calendar) and then found and loved Schedule Once.  Schedule Once allows me to set up 5 booking calendars, one for each school I visit.  I can then set my availability and give out the website to my booking calendar.  Teachers can choose their school, pick an amount of time they would like to meet, and then find an open slot.  When they book an appointment it goes to my Google calendar as well as theirs.  I even have it set up to send a reminder email to the teacher the morning before the meeting.  It is the greatest tool ever!  I don't have to worry about anything, their is no emailing back and forth, and the appointments just show up in my calendar.


Now that I had all these appointments set up, I would get really involved with helping the teachers I was meeting with, that I didn't watch the clock as carefully as I should.  So I played around with my phone notification settings.  I didn't want to get event notifications for every one of my Google calendars.  So I checked out the settings on the Google calendar.  I set it up so my work appointment calendar would send me a text message 10 minutes before the start of each meeting.  Now, I get a text, and I know I need to get moving to my next appointment.  


I look forward to a great year, and know that I will be able to have an impact on so many more student's learning.  I met a lot of other teachers who are starting working in educational technology TOSA positions this year, so I know I will be collaborating with some great teachers this year as I figure out this new job.  

Tuesday, May 13, 2014

Shorten URLs with goo.gl

When using the class sets of Chromebooks or iPads it can be hard to get links out to your students.  You can send them a document using Doctopus or post links on a webpage, but sometimes you find something in the middle of class and you need a quick way to send out a link.  

Goo.gl is the answer.  You can go to the goo.gl website and paste in a link to the web address you want to shorten.  


To make things even simpler, you can download the goo.gl shortener Chrome Extension which will show up right next to your Omnibox.  Then, all you have to do is be on whatever website you want to share, click the extension, and it will give you the short URL.  This short URL is much easier to write up on the board to share with students.  (Just be careful with some characters such as a capital i and lowercase l.  You can always click the link again to get a different short URL that is easier to read.)

Or, you can get a QR code which you can project or you can copy (Control C) and paste (Control V) it onto a document.

This should help you share links with students and get students to the right spot much quicker.


Tuesday, May 6, 2014

Sound the Alert!

Alerts is not one of Google's most well known tools, but I have found it very useful.  

Google Alerts allow you to automatically receive email alerts for search queries that you set up.  

As a teacher, I use Alerts to notify me of current events that relate to the topic I am currently teaching.  For example, during my last unit, evolution, I set up an alert using the keyword speciation.  I wanted to find current and relevant news articles that I could share with my students, but I didn't want to spend the time to keep searching the web.  Anytime google found this keyword, it sent me an email with a link to the website.

If your students are doing a research project, you can teach them how to set up alerts to get new information about their topic.

I think that Alerts would be a useful tool for school administrators to get emails each time their school is mentioned on the web or in the news.  Here is an example of a Google Alert email that I received about my school.  


It is pretty easy and quick to set up.  Just go to http://www.google.com/alerts and fill out the form with your search query.  You can change the settings to customize the search and the amount of emails you receive.  You can even set it to search blogs, news, videos, other websites!


I would love to hear other creative ideas on how you would use Google Alerts.  Please share in the comments below.


Tuesday, April 29, 2014

Copy and Paste - Using Your Clipboard History

Have you ever needed to copy and paste more than one thing at a time?  I am usually working with multiple tabs open on my Chrome Browser, and many times have multiple links or names that I am trying to paste into one document at the same time.  And it drives me nuts that sometimes I "lose" something in my clipboard when I copy something new. 
The clipboard is the place where the things you copy are stored.  You can add things to the clip board by pressing Control C on a PC, Command C on a Mac, or right clicking on something and choosing Copy.  To paste what is on your clipboard you will press Control V on a PC, Command V on a Mac, or right click and press Paste.  
I'm sure you are used to people saying "There's an app for that"....  Well, now there's an extension for that!  Clipboard History is a great Chrome extension that stays up next to your Omnibox (URL address bar) and keeps a history of all of the things you have copied.


This is a list of things I have "copied" and I can click on any of
these to bring it back to my clipboard to paste into a document.
To Use Clipboard History:
  1. The first thing you need to do to use Clipboard History is download the extension.  Click on the Clipboard History link and click on the blue "+Free" button.  
  2. After you have installed it, all you have to do is click on the icon of the orange clipboard up on the right of your screen, next to the Omnibox (address bar).  
  3. Then click on the information you previously copied and want to use again, and it brings it back into your clipboard and allows you to paste that information into whatever you are working on.

You will love this extension.  It will save you lots of time and make things just a little bit easier for you!  Just to write this blog post, I used the extension three times!


Saturday, February 1, 2014

Peer Review using Google Forms and the autoCrat Script


Students should always have feedback throughout their learning processes to help them grow and succeed.  This might be when they are writing essays, lab reports, or creating videos or other projects. Unfortunately, I don't always have all the time I would like to provide feedback, so occasionally I have students peer evaluate or review each other's work.  


In the past, I used to create rubrics and photocopy way too many papers so that each project could be evaluated by multiple other students.  This was such a waste of paper.  

Last  year, I decided to set up a Google form for students to fill out as they reviewed the work.  Then I used the autoCrat script to "mail merge" the information from the form into a nice document that was much easier to read then the spreadsheet.  This document is then automatically emailed to the student so they can review the feedback and continue working on their assignment.

I have created a screencast showing the step by step instructions on how to set this up and use the script.  (UPDATE:  Scripts are now gone b/c of the new version of sheets.  Click on this link instead for an autocrat tutorial.  The tutorial in this link is not the same form as in the below video, but it will help you use autocrat.  You may still want to watch the video below for ideas about this peer editing form.)


If you would like a copy of my spreadsheet (and form) and the merged document, click on the links below.  You can make copies of them which will save them into your Google Drive and then run the autoCrat script to set it up to use with your own students.

Click here for a copy of the spreadsheet and form.  

Click here for a copy of the merged document.

Monday, January 27, 2014

Save Time. Use Your Omnibox

The Omnibox is the search bar at the top of your Chrome Browser.  It does a lot more than just search for information or take you to your web site URL.


The Omnibox can be used as a timer, a calculator, search your google drive, and can even add events to your calendar.  

Timer
If you need a quick timer for a class activity, type timer and the amount of time into the Omnibox.  
It will start counting down.  You can even make the timer full screen by clicking on the blue image of "four corners" on the bottom right.


Calculator
Type in a problem to see it solved on a calculator.
Or just type in calculator.
You can even make line graphs....
and moving 3D graphs!


Search your Gmail (or Google Drive, YouTube, etc.)
To be able to use the omnibox to search your Gmail, you have to set it up in the Chrome settings.

1.  Go to settings.
2.  In the "Search" section, click on "Manage Search Engines".
3.  Scroll to the bottom to add your custom search engines.  
4.  In the first box, enter your new search name.  (Gmail, Drive, etc.)
5.  Then in the keyword box, enter in the letter or shortcut you want to use.  (g for Gmail, dr for Drive, etc.)  You can choose anything you want it to be.
6.  In the last box, enter in the web URL from below.
Gmail
Keyword: g
URL: https://mail.google.com/mail/ca/u/0/#apps/%s
Drive
Keyword: dr
https://docs.google.com/?hl=en&tab=bo#search/%s 
YouTube
Keyword: yt
URL: http://www.youtube.com/results?search_query=%s&page={startPage?}&utm_source=opensearch
7.  Now, when you want to search your Gmail, Drive, or Youtube, type in a g (or dr or yt) into your Omnibox, followed by tab.  You will see this:
8.  All you have to do now, it type in what you want to search your Gmail (Drive or Youtube) for.


Add Google Calendar Events from Your Ominbox
To add a calendar event directly from your omnibox, you will do the same thing as above.  Go to settings, manage search engines, other search engines, and then add in the following:
Add Calendar EventKeyword:  cal
URL:  http://www.google.com/calendar/event?ctext=+%s+&action=TEMPLATE&pprop=HowCreated%3AQUICKADD

Now, to use it, type "cal" into the Omnibox and press tab.   
Then, type in the name of the event, the date, and time.  It will bring you to the calendar event add page.  And then you can choose your calendar, edit the event, and then save the event!


One Last Tip
Have you ever had too many tabs open, and want to easily and quickly switch back and forth between tabs?  Press "Control" and the Number "3" (If I want to open the third tab).  On a mac, press "Command" instead of "Control".


Maybe Just One More....
To open a tab that you accidentally closed, type "Control", "Shift", and "T".  (On a Mac:  "Command", "Shift", and "T")


Sunday, January 19, 2014

Help Students Find Credible Sources

Common Core State Standards & Finding Credible Sources
Common Core Standards require that students are able to find sources when doing research and analyze them for credibility.  Here is an applicable CCSS standard for Writing in History, Science, and Technical Subjects: 
CCSS.ELA-Literacy.WHST.9-10.8 Gather relevant information from multiple authoritative print and digital sources, using advanced searches effectively; assess the usefulness of each source in answering the research question; integrate information into the text selectively to maintain the flow of ideas, avoiding plagiarism and following a standard format for citation.
Finding Sources can be tough for students.  I cringe when students post google.com or wikepedia.com as their sources in their bibliography.  I want my students to learn how to find actual and credible sources (and be able to site them properly).  Wikipedia is a good starting point to find out general information, or find links to other sources, but Wikipedia itself should never be their source.  And google.com is a search engine, not a source!

The first thing I do to help my students is to find some reliable sites and create a Custom Google Search for my students.  Students don't search the entire web, but use a custom search bar on my webpage that only searches sites that I have preselected.  Here is a link to my previous post about creating Custom Google Search Engines.  But even then, how do students really know that the source is reliable?  They won't always have a teacher creating a Custom Search Engine for them.  Students need to be able to determine if the website is credible.

A Great Idea from Catlin Tucker
Last fall, I attended the Fall CUE conference in Napa, and went to a session by Catlin Tucker - Common Core:  The Art of Argument Writing.  (If you ever get a chance to see her, be sure you do!  And read her book - it is great if you are thinking of how to integrate technology and Common Core practices into your classes.)  

One of the activities she shared was her Got Credibility? Google Form.  (Here is a link where you can find a copy of her form and her video on how to make a copy of it so that you can use it with your students.)  This form asks the students to answer questions about their web source such as "Does the source have an author?" or "Is there any bias presented in this resource?".  After students go through all of the questions, they should have a pretty solid idea of whether their resources is credible.  

I copied Catlin's form, and modified it a little bit for my class.  (In my biology class, I have students use APA instead of MLA.  I also added some info on websites that will work on our iPads to get the APA citations.)  I then set up the Google Script autoCrat to merge the data students submitted on the form into a Google Doc that was then emailed back to them.  I wanted students to have access to their citations and work that they did when they checked the credibility of their sources.


My Lesson Plan
When I first introduced this form to my students, I asked my students what resources they use to research a topic.  We had a discussion about credibility, and then I showed them the Google form.  I then gave them a website/resource to use to fill out the Got Credibility form.  I used a great website called Help Save the Endangered Pacific Northwest Tree Octopus.  This website is very detailed and students have to navigate around it to be able to answer the questions on the Got Credibility form.  

Students spent the rest of the period exploring the Tree Octopus website and checked its credibility by filling out the form.  Below is a copy of a filled out form from one of my students.  (This is what was emailed to each student after they submitted their form and the autoCrat script merged the data and sent them the document.)  Most students discovered that the source was NOT credible, that in fact it was a hoax.  


Click here to view the original document

After the students participated in this activity in class, I had them search for their own resources to use as sources for their upcoming research project.  I required them to complete the form for each of their resources that they used in the project.  After filling it out a few times, they now seem to have a good grasp on how to tell if a resource is credible.  Here is a video one of my students made of tips on determining the credibility of a source.


Other Hoax Sites
I have been searching for other "fake" websites to use when introducing the Got Credibility form.  Here are a few good ones.


If you find any other good hoax cites, please list them in the comments.

Resources
Here is a copy of my version of Catlin's Got Credibility? spreadsheet/form and the merge document I used with autoCrat to send out a filled out form/document to my students.   Be sure to make copies of both into your Google Drive.  You will then need to install the autoCrat script into the spreadsheet, and then link the merge fields from the document template when you set up the script.

Saturday, January 11, 2014

The Google Cultural Institute - an Amazing Resource for Educators

If you can't take your students on field trips  to view artwork in museums, visit other countries to view heritage sites, or show them original archives, bring the world to your students in your own classroom.

Google Cultural Institute is an amazing resources that is broken up into three sections:  Art Project, World Wonders Project, and Archive Exhibitions (Historic Moments).  

I learned about the Google Cultural Institute a few months ago, but didn't really explore it in depth until after I attended the Google Teacher Academy last month in December.  I think it is a wonderful tool for teachers to use in their classes.  Below, I have described the resources available and included some screen shots and Google created intro videos to introduce the different parts of the Google Cultural Institute. 

I believe that this is a great tool that can be utilized in every subject area with a little creativity. It's pretty obvious how history and art teachers would use it.  But math teachers could have students calculate the angles on historical buildings using the World Wonders Project.  World language teachers could have students visit historical sites or look at artwork created in the countries that students are learning about.   Science teachers could have students learn about ecosystems and environments, or the see some the effect of the nuclear bombs in the Historic Moments Collection.  English teachers can have their students visit the Globe Theatre. 

Check it out.  The Google Cultural Institute is an amazing tool that can bring the world to your students.

Art Project

Art Project has brought "street view" inside museums around the world, which you can access from any computer in an internet equipped classroom.  

Walk the floors of the Museum of Modern Art and discover Van Gogh's Starry Night,

look at the entire painting,

and even zoom in to see the brush strokes.

You can even create galleries of work and compare two pieces of artwork at once.  The museum exhibits not only include paintings, but textiles, statues, etc.  And, the educator page gives you some lesson ideas and you create your own quizzes.


World Wonders Project

The World Wonders Project brings World Heritage Sites to life with Google Street View and 3D Modeling.   

View images and street views of amazing historical and important sites from around the world and learn about the history of each location.

Visit the World Wonders Project education page for resources and lessons for educators.


Historic Moments

Explore online exhibitions (including photos, documents, videos, etc.) detailing the stories behind significant moments in human history.  Learn about Nelson Mandela, Marie Curie, the bombing of Hiroshima, and much more.  

Search
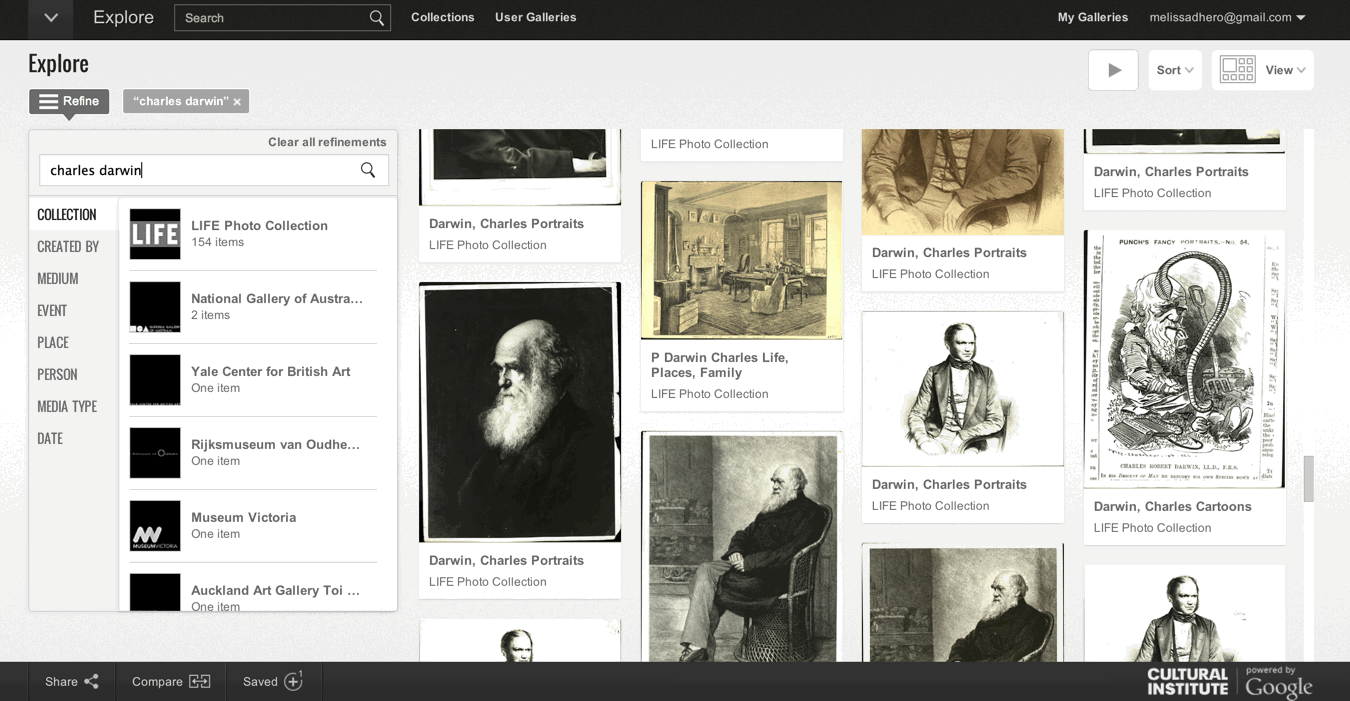
The search feature is great.  It allows you to search for any topic or historical figure and find information, videos, photos, and other media.  The LIFE photo collection is included in the Google Cultural Institute too.


Learn How to Use the Google Cultural Institute
Watch this quick video to learn how to use the Google Cultural Institute website.