Showing posts with label Google Docs. Show all posts

Tuesday, March 11, 2014

Research in Google Docs - Using the Research Tool and NEW Easy Bib Add-on

Can Google Docs get any better?  They always seem to be coming out with new tools that make life easier.  I love how they are always changing for the better.

Today, Google just added Add-ons to their Docs and Sheets.  Add-ons are tools created by developer partners that add extra features to help you do your work.

One of the cool new Add-ons is by Easy Bib.  Easy Bib is an amazing tool to help you write bibliographies.  The new (free!) Add-on integrates into your Google Docs.  Once you install the Easy Bib Add-on, you can use it in each of your documents to help you create a perfectly formatted bibliography in APA, MLA, or Chicago styles.  It even indents the second line!

Here's a video on how to use the Add-on as well as how to use the Google Research Tool to find sources, insert them into your document, and cite the sources as footnotes.


Saturday, February 1, 2014

Peer Review using Google Forms and the autoCrat Script


Students should always have feedback throughout their learning processes to help them grow and succeed.  This might be when they are writing essays, lab reports, or creating videos or other projects. Unfortunately, I don't always have all the time I would like to provide feedback, so occasionally I have students peer evaluate or review each other's work.  


In the past, I used to create rubrics and photocopy way too many papers so that each project could be evaluated by multiple other students.  This was such a waste of paper.  

Last  year, I decided to set up a Google form for students to fill out as they reviewed the work.  Then I used the autoCrat script to "mail merge" the information from the form into a nice document that was much easier to read then the spreadsheet.  This document is then automatically emailed to the student so they can review the feedback and continue working on their assignment.

I have created a screencast showing the step by step instructions on how to set this up and use the script.  (UPDATE:  Scripts are now gone b/c of the new version of sheets.  Click on this link instead for an autocrat tutorial.  The tutorial in this link is not the same form as in the below video, but it will help you use autocrat.  You may still want to watch the video below for ideas about this peer editing form.)


If you would like a copy of my spreadsheet (and form) and the merged document, click on the links below.  You can make copies of them which will save them into your Google Drive and then run the autoCrat script to set it up to use with your own students.

Click here for a copy of the spreadsheet and form.  

Click here for a copy of the merged document.

Monday, January 27, 2014

Save Time. Use Your Omnibox

The Omnibox is the search bar at the top of your Chrome Browser.  It does a lot more than just search for information or take you to your web site URL.


The Omnibox can be used as a timer, a calculator, search your google drive, and can even add events to your calendar.  

Timer
If you need a quick timer for a class activity, type timer and the amount of time into the Omnibox.  
It will start counting down.  You can even make the timer full screen by clicking on the blue image of "four corners" on the bottom right.


Calculator
Type in a problem to see it solved on a calculator.
Or just type in calculator.
You can even make line graphs....
and moving 3D graphs!


Search your Gmail (or Google Drive, YouTube, etc.)
To be able to use the omnibox to search your Gmail, you have to set it up in the Chrome settings.

1.  Go to settings.
2.  In the "Search" section, click on "Manage Search Engines".
3.  Scroll to the bottom to add your custom search engines.  
4.  In the first box, enter your new search name.  (Gmail, Drive, etc.)
5.  Then in the keyword box, enter in the letter or shortcut you want to use.  (g for Gmail, dr for Drive, etc.)  You can choose anything you want it to be.
6.  In the last box, enter in the web URL from below.
Gmail
Keyword: g
URL: https://mail.google.com/mail/ca/u/0/#apps/%s
Drive
Keyword: dr
https://docs.google.com/?hl=en&tab=bo#search/%s 
YouTube
Keyword: yt
URL: http://www.youtube.com/results?search_query=%s&page={startPage?}&utm_source=opensearch
7.  Now, when you want to search your Gmail, Drive, or Youtube, type in a g (or dr or yt) into your Omnibox, followed by tab.  You will see this:
8.  All you have to do now, it type in what you want to search your Gmail (Drive or Youtube) for.


Add Google Calendar Events from Your Ominbox
To add a calendar event directly from your omnibox, you will do the same thing as above.  Go to settings, manage search engines, other search engines, and then add in the following:
Add Calendar EventKeyword:  cal
URL:  http://www.google.com/calendar/event?ctext=+%s+&action=TEMPLATE&pprop=HowCreated%3AQUICKADD

Now, to use it, type "cal" into the Omnibox and press tab.   
Then, type in the name of the event, the date, and time.  It will bring you to the calendar event add page.  And then you can choose your calendar, edit the event, and then save the event!


One Last Tip
Have you ever had too many tabs open, and want to easily and quickly switch back and forth between tabs?  Press "Control" and the Number "3" (If I want to open the third tab).  On a mac, press "Command" instead of "Control".


Maybe Just One More....
To open a tab that you accidentally closed, type "Control", "Shift", and "T".  (On a Mac:  "Command", "Shift", and "T")


Sunday, January 19, 2014

Help Students Find Credible Sources

Common Core State Standards & Finding Credible Sources
Common Core Standards require that students are able to find sources when doing research and analyze them for credibility.  Here is an applicable CCSS standard for Writing in History, Science, and Technical Subjects: 
CCSS.ELA-Literacy.WHST.9-10.8 Gather relevant information from multiple authoritative print and digital sources, using advanced searches effectively; assess the usefulness of each source in answering the research question; integrate information into the text selectively to maintain the flow of ideas, avoiding plagiarism and following a standard format for citation.
Finding Sources can be tough for students.  I cringe when students post google.com or wikepedia.com as their sources in their bibliography.  I want my students to learn how to find actual and credible sources (and be able to site them properly).  Wikipedia is a good starting point to find out general information, or find links to other sources, but Wikipedia itself should never be their source.  And google.com is a search engine, not a source!

The first thing I do to help my students is to find some reliable sites and create a Custom Google Search for my students.  Students don't search the entire web, but use a custom search bar on my webpage that only searches sites that I have preselected.  Here is a link to my previous post about creating Custom Google Search Engines.  But even then, how do students really know that the source is reliable?  They won't always have a teacher creating a Custom Search Engine for them.  Students need to be able to determine if the website is credible.

A Great Idea from Catlin Tucker
Last fall, I attended the Fall CUE conference in Napa, and went to a session by Catlin Tucker - Common Core:  The Art of Argument Writing.  (If you ever get a chance to see her, be sure you do!  And read her book - it is great if you are thinking of how to integrate technology and Common Core practices into your classes.)  

One of the activities she shared was her Got Credibility? Google Form.  (Here is a link where you can find a copy of her form and her video on how to make a copy of it so that you can use it with your students.)  This form asks the students to answer questions about their web source such as "Does the source have an author?" or "Is there any bias presented in this resource?".  After students go through all of the questions, they should have a pretty solid idea of whether their resources is credible.  

I copied Catlin's form, and modified it a little bit for my class.  (In my biology class, I have students use APA instead of MLA.  I also added some info on websites that will work on our iPads to get the APA citations.)  I then set up the Google Script autoCrat to merge the data students submitted on the form into a Google Doc that was then emailed back to them.  I wanted students to have access to their citations and work that they did when they checked the credibility of their sources.


My Lesson Plan
When I first introduced this form to my students, I asked my students what resources they use to research a topic.  We had a discussion about credibility, and then I showed them the Google form.  I then gave them a website/resource to use to fill out the Got Credibility form.  I used a great website called Help Save the Endangered Pacific Northwest Tree Octopus.  This website is very detailed and students have to navigate around it to be able to answer the questions on the Got Credibility form.  

Students spent the rest of the period exploring the Tree Octopus website and checked its credibility by filling out the form.  Below is a copy of a filled out form from one of my students.  (This is what was emailed to each student after they submitted their form and the autoCrat script merged the data and sent them the document.)  Most students discovered that the source was NOT credible, that in fact it was a hoax.  


Click here to view the original document

After the students participated in this activity in class, I had them search for their own resources to use as sources for their upcoming research project.  I required them to complete the form for each of their resources that they used in the project.  After filling it out a few times, they now seem to have a good grasp on how to tell if a resource is credible.  Here is a video one of my students made of tips on determining the credibility of a source.


Other Hoax Sites
I have been searching for other "fake" websites to use when introducing the Got Credibility form.  Here are a few good ones.


If you find any other good hoax cites, please list them in the comments.

Resources
Here is a copy of my version of Catlin's Got Credibility? spreadsheet/form and the merge document I used with autoCrat to send out a filled out form/document to my students.   Be sure to make copies of both into your Google Drive.  You will then need to install the autoCrat script into the spreadsheet, and then link the merge fields from the document template when you set up the script.

Monday, September 2, 2013

The BEST Way to Assign and Share Google Documents with Students

The best way to organize, assign, and share google documents with students is using the script gClassFolders.

I have been using google docs with my students for years.  Last January we became a Google Apps for Education (GAFE) school and I began to discover google scripts.  Scripts are magic!

In the past, I had had students create their own documents and share them with me.  I gave them a specific way to name/title the documents, but they didn't always follow my instructions.  And many times they would forget to change the sharing rights and I couldn't view their documents.  And I was so bad at organizing my google drive - their files were everywhere.

That is where the magic of scripts come in.  I can send out documents to students that are already name properly, with the student name, class period, and assignment in the title of the document.  I can control the sharing rights and even "embargo" the assignments, by changing student editing rights so they can't change the document after the due dates.  And I can automatically organize the documents into class or student folders.  I can use google search to find them, or go to a spreadsheet for an assignment and click on the link to each student's document.

To do all of this scripting magic, I use gClassFolders to set up the folders for each class and student.  Then to send out the documents/assignments, I use the hub in gClassFolders to run the Doctopus script.  I can assign individual or group assignments and change the share settings for the entire class at one time.

In the following videos I will share how I export my class rosters from Infinite Campus, run the gClassFolders script to set up my class and student folders, and then run the Doctopus script to send out an assignment.  


How to export class rosters from SUHSD's Infinite Campus and auto type in student email addresses:


How to set up and run gClassFolders:


How to send out documents using Doctopus:


*Note (9/3/13):  It looks like you can now create folders in your gClassFolder Teacher folder and they will show up in Doctopus when choosing folders for templates.  When I created this video, that was not an option.)  

This seems like it is a really complicated process, but you only need to set up gClassFolders once - at the beginning of the year.  If students enter or leave your class, you can update your gClassFolder roster and run the script again.  

From that one original roster, you can then run three other scripts; Doctopus (for sending out documents and running the goobric (rubric) script), Autocrat (a mail merge script), and pageMeister (a script that creates a page for each student on a class website).  

The first time I did this, it took less than a half an hour.  Once you get the hang of this, it will be a snap each time you assign students a google document or presentation.  


Pictures of Documents, Folders, etc. After Using the Scripts:


Sites with more script information:


Sunday, August 4, 2013

Organizing Data Collected From a Google Form Using the DocAppender Script

When collecting paragraph text data from a google form, it can be really challenging to read. If the answers are long, sometimes you can't scroll to see the whole response.  And the data is incomplete and hard to read in the summary of responses.


Wouldn't it be nice to have all the data in a nice table or bulleted list on a google doc?  There is a solution!  The script, DocAppender, by Andrew Stillman, allows you to do just this.  Here is a sample document which has form submissions appended in a table to the bottom of the document.

I have created a screencast with step by step instructions on how to setup and run this script. 
 

This script will be a great tool when students are brainstorming ideas and I want to post them at the front of the room for all to see.  You can also use it to collect feedback or ideas at professional development workshops.  Andrew Stillman explains how he uses it for classroom observations in his video.  If you have other ideas on how to use this script, please leave a comment. 

Tuesday, July 9, 2013

CUE Rockstar Tahoe: What I Learned on Day 1

Today was the first day of my first CUE Rockstar, in Tahoe, CA.  

There were ten presentations to choose from for the day, and each participant could choose two to attend.  Today's theme was "Getting Googley".  The two sessions I chose to attend were Black Belt Google Drive by Kevin Brookhouser and Awesome Cross-Curricular Projects with Docs and Drive with John Stevens.  I am pretty familiar with Google Apps for Education, so while many of the presenters are people I follow on twitter and I want to meet and learn from, I chose those two workshops because I feel that I would get the most out of them.  I was hoping to learn some advanced tips in Kevin's workshop and create a lesson using GAFE in John's session.

Black Belt Google Drive
In Kevin's session, Kevin shared how some examples and walked the participants through using scripts such as Flubaroo and Doctopus.  I have used both in my classes and during the time given for us to test them out, I shared my lessons and how I used it with a few attendees sitting near me.  Flubaroo and Doctopus are great scripts which make a teacher's life easier when giving quizzes and having students/groups work on documents in google drive.  Kevin has some video tutorials for both of those on his website if you want to learn more.  Don't be afraid of scripts... they really are AMAZING.  Watch his videos to learn how to use them.

I picked up a few things from Kevin and the others in the class trough out the session that I will definitely try out.  Here are some notes:


Keyboard shortcuts
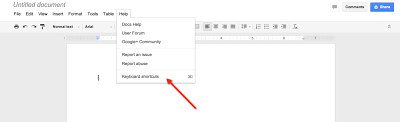
Save time when inserting comments into a google doc using keyboard shortcuts.  Choose option+command+m to insert a comment.  To submit that comment, type control+enter.  To find a list of comments, in google drive (in the doc, spreadsheet, etc), go to help, and then keyboard shortcuts.

Spreadsheet Autofill
In spreadsheets, I knew how to autofill to create numbered lists or days of the week. You type in the first few numbers, days, etc.  Then highlight the cells.  On the bottom right of the bottom cell, there is a blue handle or box.  Click on that and drag down.  Google will automatically fill down with the next values in the series.

But that is not all you can do when using the autofill!  Kevin shared a cool trick to fill other types of things - like brands of cars, motorcycles, types of fruit, presidents, and even beers, etc.  Basically, you do the same thing, but this time, when dragging down the little blue box, be sure to hold down the option key on your Mac.


Change Default Font in Google Drive
If you have ever wondered if it is possible to change the default font or font size in your google docs, there is a way to do it!  First, you would change the font to what you want it to be.  Second, you need to go to the box that shows normal text (next to the font in the upper menu).  Then click on normal text.  A drop down shows up.  Hover over the section for normal text and click on the arrow on the right.  Then choose "Update 'Normal text' to match".  


This has only changed this particular document.  (You can also change title, subtitle, etc. here.)  To make this global - to change the default for all of your google docs, you need to complete a second step.  You will now go to options at the bottom of the "normal text" drop down list.    Choose "Save as my Default Styles".  

Now, you have successfully changed the default fonts for all future google docs that you create.  A great use for this in the classroom is to teach students how to change the defaults to the MLA format (or for my biology students, APA). 

Chrome Extensions
Kevin shared a cool chrome extension which allows you to easily create a google doc from within the chrome browser, instead of having to open up google drive.  It is called Docs Quickly.  I couldn't find it from the chrome store, but did find Google Docs Quick Create. You can quickly create docs, presentations, spreadsheets, drawings, and forms by clicking on the drive icon in your browser bar.

Templates
There are templates available to download into google docs.  They can be found in the Google Template Gallery.  A participant shared a template that looks like a lot of fun to use in class - Historical Facebook Page.  How much fun would it be for students to create facebook pages for famous scientists (other historical figures, characters in a novel, etc.)?  


Incognito
I have multiple gmail accounts (personal and GAFE) and have been using multiple users in chrome.  This allows me to not have to worry about logging in/out each time I want to switch which account I use.  I had seen people who have logged in using "incognito" before, but didn't understand why I would want to use it.  

Many times when I am testing out webpages or documents that have created, I need to make sure that it will work for the public or people not in my GAFE network.  If I log in using Incognito, I can check all of this.  The shortcut key to switch over to incognito is Command+shift+n.

Thank you Kevin for a great workshop!  I enjoyed learning these new tips and tricks.

Awesome Cross Curricular Projects with Docs and Drive
I chose John Steven's cross-curricular session for my second workshop.  I have always wanted to work with teachers outside of my curriculum area to create a project, but it hasn't been easy at my school.  We don't have any provided time to work across subject areas.  I loved that John provided this opportunity for us today.

I paired up with a math teacher, Andrew Hyland, and another biology teacher, Thomas Safford, today.  We wanted to plan an intro unit on graphing.  After discussing the different types of biology labs we do that requiring graphing, we discovered that our ecology/population lab with exponential graphing matches up perfectly with the time of year the Algebra teachers generally teach graphing quadratic equations.  

We created a multi-day lesson where the bio teachers would teach about population growth at the same time that the Algebra teachers are teaching graphing quadratic equations.  It is still a work in progress - but I have a concrete example/idea that I can use when approaching the Algebra teachers at my school about collaborating.  I can't wait to see if any of the teachers at my school are interested.  

During the workshop I was listening in on another project that Brandon Dorman was working on.  He was trying to find a way to give students a template for a presentation that included his comments about what he expected of them for each section, sort of like a rubric.  He wanted it in front of the students as they presented.  I recommended that he create a google presentation, and put his comments in the notes section.  Then students could see the notes as they presented.  Brandon tested it out, and it did what he wanted when the presentation was shared with others.  The coolest part, was that Brandon tried to send out the presentation template using Doctopus.  He discovered that Doctopus can send out presentations to students, not just documents!  That is something that I will definitely use in my classes next year.

John will be tweeting out a website with all of the lessons created during his sessions today. I am excited to see all of the final lessons.

Next Steps
I learned a lot of great new things today and needed to spend the time writing this really long blog tonight to process and remember all that I learned.  Hopefully there aren't too many typos or errors - I'm getting tired and don't want to proof it again....  If you have read this far, hopefully you can use some of these tips in your classes too.  I am excited for the next two days and now need to figure out what sessions I will attend tomorrow.

Sunday, June 23, 2013

Digital Science Notebooks using iPads: Google Drive/Blogger vs. Evernote?

My students had been using a class set of iPads for a semester last school year.  Many times, students would ask, "Why are we still using paper?"  My goal for this school year is to  become a paperless (or near paperless) classroom.  I don't think I can do this 100% just yet, some students don't have an easy time accessing technology outside of my class, so I have to provide paper instructions, but I want to head in that direction.  

For the last few months I have been thinking about how I can have my students keep a digital science notebook.  Ideally, it would include class notes (from their watching of flip class videos I have created), lab reports, analysis of reading and current events, and reflections on what they are learning.  (I have had them keep a spiral notebook containing all of this in the past.)


Last year, I had students use Google Drive, Blogger, and Schoology for a lot of their work.  Students would write papers in google docs, then submit them to Schoology for me to grade, or post the work on their blog.  Sometimes they would share their google docs with me when I used the scripts Autocrat or Doctopus.  If students wrote something by hand, they would take a photo of it in google drive, then submit it to Schoology.   So I wasn't really collecting anything on paper, but I was still giving them handouts with instructions.   In addition, many times students were still doing their work on paper.  (I gave my students the option on how to complete their assignments.  Some students still did not feel comfortable creating and doing all assignments on the iPads, so they always had the choice to create things on paper.)

I really liked using Schoology to collect all the assignments.  I could give students feedback, they could resubmit their work, and there was no way for me to loose a paper or for the student to say "I swear I turned it in" because everything is timestamped when submitted online.  I could also assign grades in Schoology and I could grade assignments anywhere.  Schoology also lets my students have structured online conversations, and it is great for exams.  My students can take multiple choice, fill in the blank, as well as essay type exams.  It was easy for me to grade the exams, and I didn't have to carry around stacks of essays to read, it was all online.

This year, I want to utilize the digital science notebook a little more. I want it to be a portfolio of their best work.  When students turn things in using Schoology, they have access to all of their assignments, but it isn't as easy as flipping through a notebook.  I want students to have everything in one spot which is easily accessible.  I want my students to reference their work and not just forget it is there.  So I have been looking at using Evernote for this or utilizing Google Drive a little differently where students can post links to their work with reflections on a blog.  

Here are some comparison from my research.


Using iPads
Pros
Cons
Evernote
·      Just one app to use
·      Searchable (can search for typed and handwritten text)
·      Can take photos from within app and record audio

·      Students can’t share folder (Teacher has a premium acct and shares w/ each student, but students can’t share or collaborate w/ others)
·     I could get a business account for my students, but it costs about $30/student/year.
Google Drive & Blogger
·      Students can share with others to collaborate and comment
·      Blog is public to the world.  When students publish on the web where the world can see, they tend to take their work more seriously.
·      Students can easily add youtube videos which they have created in iMovie or Explain Everything to their blog.
·      Have to use multiple programs (Drive app – only allows docs and spreadsheet, drive on browser using desktop view – allows you to add pics and additional things than the app, blogger app – most reliable to use when on the iPad, blogger on browser – to create an account)
·      Documents can’t be searched like Evernote
·     Using the Drive app, students can only share docs with an email, they can't get the link to share and post the link.


At this point, I am thinking I like the ease of using Evernote on the iPads.  I love that everything (taking pics and recording audio) can be done right in the app.  But I really want the students to be able to collaborate and share with a larger audience.  So even though it will require a few more steps in some cases, I think I am going to have my students set up blogs and continue to use Google Drive.

I will still be able to have students turn in some assignments using Schoology, but I can have   important assignments shared on their blogs.  I want to try to minimize the number of apps/tech I use.  I don't want to overwhelm my students.  However, I think that the blogs will allow my students to share and get feedback from peers and others across the world.

If you have any experience with this, or suggestions, ideas, etc. please share with me.  I am still not entirely convinced I have made the best decision, and wold love feedback.