Sunday, December 3, 2017

Tips for Managing Your Gmail Inbox


There is always too much email.  When you sit down to read and act on the emails, it can feel like you are drowning and will never get your head above water.  Fortunately, there are some ways to clean up your inbox and get it down to zero.  Or if not zero, something more manageable.

Search
Gmail is created by Google.  In my opinion, Google is the best search tool out there.  And, the best part about Gmail is that it can be fully searched using Google's search engine.  

You can search and find anything in your Gmail account by using the search box at the top of the Gmail page.  And if you click on the little arrow at the right side of the search box, you will be able to do some pretty cool advanced searches, like search for emails that have specific words, have an attachment, or are within a specific date range.  (You can also use search words instead of clicking on the arrow to get to the advanced search.  Check out this PDF Gmail Search Cheat Sheet from Alice Keeler.) So go ahead, and file away those emails using labels or the archive tool, because you can easily search for your emails later.  


Trash vs. Archive
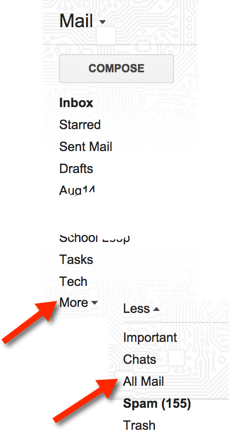
In a G Suite for Education account, you have UNLIMITED free storage.  So there is no need to delete your emails.  And, if you delete an email, it will permanently disappear in 30 days, so you won't be able to find it later.  So instead of deleting your emails, ARCHIVE them.  In Gmail, archive basically means taking your email out of your inbox.  You can place it in a labeled "folder", or just click archive, and it will take it out of your inbox.  You will then be able to find it by searching, looking in your "folders", or in your "All Mail".  You can also archive multiple emails at once by clicking on the little check box at the top of your screen, then clicking on archive.   


Labels
Gmail has "labels" instead of "folders".   A folder system, like in many other email programs, only allows an email to be in one folder at a time.  Gmail uses labels instead.  One email can have multiple labels, and you can find that email by looking in the different "folders" with that label on the left of your screen.  So use those labels to your advantage to organize your mail.  And you can create filters which will automatically label (based on certain criteria) emails when you receive them, saving you some time. 

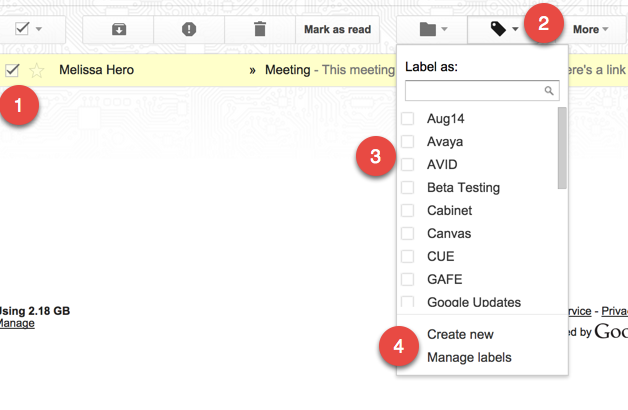
  1. Check the box next to an email (or multiple emails).  
  2. Click on the label icon.
  3. Check all the boxes of the labels you want for that email (or group of emails).
  4. Or, create a new label.
Note:  When you add a label to an email, it does not automatically move the email out of your inbox.  You must archive it.  OR, you can click on the folder next to the label to move it.  (But if you choose the folder, you can only move it to that one folder.)  


Filters
Filters can automate actions for you.  You can mark all emails with certain key words in the subject area, text, or from specific people as read, or have them skip your inbox, or be automatically marked with certain labels.  Here are instructions on how to set this up.  

Conversation View
The default view of emails is that they are grouped together in a conversation.  So all emails and their replies are linked together in a thread.  For example, if you send me an email, then I reply to it, and you send me another reply, all emails will show up as one conversation and take up one line in your inbox.  This will help keep conversations together and you can easily see all communication regarding that topic in one place.  When you are ready to archive a conversation, all emails in that thread will be archived.  (If you had the emails separate, you would need to archive each email individually.)  To make sure your emails are set to conversation view, go to the gear in the top right corner of your gmail.  Choose settings.  Scroll down, and turn Conversation View on.

Add Emails to your Calendar
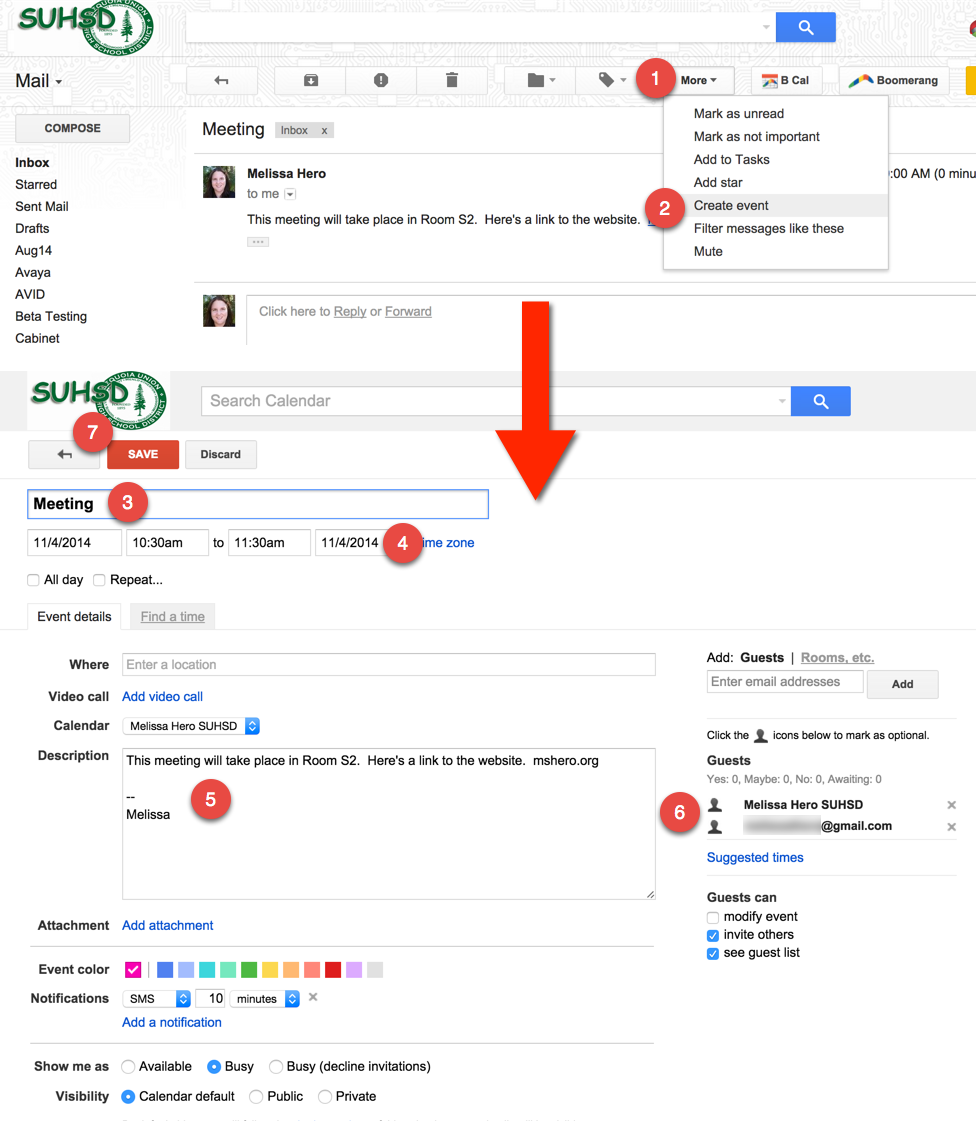
Many times I keep emails in my inbox because they relate to a meeting or event that is coming up.  Gmail allows you to create an event from a gmail, and the text of that email will be added into the details of the event.  Once I add an email to a calendar event, I can archive the email, and still find all of the relevant information in the details of the calendar event.  To add an email to a calendar event, follow the steps below:

  1. Click on "More" at the top of the email.  
  2. Choose "Create event".
  3. The title of the event will be the subject of the email.  You can edit this.
  4. Set the correct date and time of the event.
  5. The description will include the text of the email.  If the email was long, it may not include all of the text.  Just go back to the email, and copy and paste the entire email into this box.  
  6. The event will automatically include all people who the email was sent to as guests.  When creating an event, you may want to delete the guests so they all don't get email invites.  
  7. Press Save.

Create a Task from your Email
Sometimes an email doesn't represent an event that you want to place on your calendar, but it might be something you need to add to your to do list.  You can add emails to your Google Task list, and a link to the email will be added to the task.  Then you can go ahead and archive your email, because you'll be able to see it by clicking on the link in your task.  Below are instructions on how to add an email to a task:

  1. Click on "More" above the email.
  2. Click "Add to Tasks".
  3. It will create a task and your task window will open at the bottom right of your screen.  If you click on the arrow to the right of the task you can edit it and add a due date.
  4. You can change the name of the task.  It defaults to the subject of the email.
  5. You can pick a due date.
  6. Add in notes.
  7. The link to the related email allows you to open the email that may contain info, links, etc.
  8. You will see the tasks in your Google calendar on the date the task is due.  Make sure you turned on the "Tasks" calendar in your "My Calendar" list.
  9. When clicking on the task in your calendar, you will see the notes and can click on the related email link to go back to the email.

Hopefully these tips will help you get your inbox down to zero!  
If you have any other tips or suggestions, please add it to the comments. 

Wednesday, May 17, 2017

Breakout Edu Tips

I first learned about Breakout Edu at the Ed Tech Team's Google Apps Summit in July 2015.  I was excited to try it out with my own class, but I had just left the classroom.  I felt the idea of using Breakouts is such a great engaging way to provide content to students, as a intro to a unit or as a review, while also allowing students to practice communication, collaboration, and critical thinking skills.  I purchased a box, and decided to use it to train teachers in my district.  I set up a few games and tested it out with teachers, but they were always small groups.  Returning to the classroom this year, I finally got to run Breakouts in a real classroom full of high school students, and I learned a lot through trial and error about how to set things up to run with a larger class size.  I will share some of the things that I have found work for me.


  • I bought four kits, so I could break up my classes into groups of around 8-9 students.  I found that to keep the most students engaged, I need them to work in smaller groups.  I researched the ticket system, and it seemed a little to complicated for me.  
  • I color code EVERYTHING.  One kit and all of it's handouts and materials are all the same color.  Green, Red, Yellow, or Blue.  I bought reams of the four colors of cardstock.  
  • I laminate everything.  I could not live with out my laminator, card stock, and paper cutter.  Laminating protects it from students, and also allows me to easily reuse things in the future.
  • I give each group a set of wet erase markers, so they can write on the laminated papers.  They have to clean and dry them at the end of each period.  This saves me the time of having to replace papers each period if they just used pen/pencil.
  • All materials for a group are placed on a colored tray which goes on their table, inside of an envelope, with a label that includes their color and a list all the materials that should be returned to the envelope.  Sticker Dots make great labels for items too.
  • I create an envelope with all things that go into the locked boxes, and that envelope has a list of materials and other things I may need to set up.  There is another envelope with the answers to puzzles.  All of these envelopes for a game are kept together so I can reuse them in the future.
  • I create a new Lock Parking Lot for each game, displaying the locks used in each game.  It's color coded, laminated, and in the same color box.  When students open a lock, I have them put the lock on the tracker, still open, still on the combo.  They can turn the lock upside down, so other's can't peek.  This makes it way easier for me to put everything back together during the quick passing period between classes.  It also prevents some types of locks to being accidentally reset to an unknown combination.
  • I create a Lock Tracker Sheet (one of each color) that goes on a clipboard (matching color) for each team.  I make a new one for each game, that shows the locks that they will have to solve.  When they think they have solved a clue, they need to write the combo and reason for the combo on the tracker.  Then, they can go to the locks.  I had a problem of students just hanging out and trying random combinations.  The lock tracker helped.
  • I came up with a Locksmith role, with a name tag, on a lanyard (color coded, of
    course).  Each team chooses a locksmith, and they are the only student that can go to the lock and try to open it.  They must take the clipboard with them, and can only try that code.  I had too many students at the locks, trying random codes, and this has helped, in addition to using the lock tracker sheet.
  • When a team finishes, I reset all their materials and locks.  Resetting four boxes at once is hard, so I need to work quickly and take advantage of a team finishing early.
  • I like to mix students up, so I use little table cards at the center of each table.  I have

    four at a desk, and they each have a color or shape.  I split up those teams by color, and students go to the assigned color's box work area.  I can use it for other groupings or to assign roles using the color or shapes during other activities.  I made them using bamboo coasters, printed cardstock, mod podge and modpodge sealer,
    and velcro.
  • I create a "cheat sheet" for the lab using Google Drawings.  It shows all the boxes, where the locks are, and the clues/combos.  It helps me set up, and remember what everything is for when students ask for clues. It also helps me as I am making my own breakouts, or using and modifying ones I find online.   
  • I space out the four boxes at one side of my room, using a variety of things - Chromebook cart, rolling cart, teacher demo station, etc.  I want to easily monitor the locks, but space them out far enough so their aren't any wandering eyes.  This also helps me reset things between classes, because everything is on one side of the room.  
  • I need to have games where the clues aren't directly linear.  I need a bunch of "active clues" so groups can break up and tackle things in small sub groups.  If all 8 or 9 students were working on one clue at once, students can get bored or restless.  I have found some linear games that I modified so that my students had access to multiple puzzles at once.
  • Reset all of your locks after each game to a generic code.  Write it down somewhere safe.
My students have really enjoyed the Breakout activities we have done this school year.  It's so amazing to see so much creativity and critical thinking.  I am doing my last one for this school year tomorrow, and have so many ideas for how to incorporate more into my classes next year.  

Monday, August 15, 2016

My Classroom Vision and Mission Statements

At today’s welcome back staff meeting, my administrators asked the staff to think of our own personal vision and mission statement for our classroom.  After being out of the classroom for the past two years, and returning to teaching biology this year, I’ve really been thinking about my role in education and my goals for this year.  I’ve thought about what changes I want to make since I was last in the classroom and this was a great opportunity to really start formulating a plan.   


This is what I’ve come up with so far.  It is a work in progress.  I think the 21st Century Learner idea is getting a little old and overused, but these are skills I really want my students to leave my class with.


My Vision Statement: My students will be 21st Century learners.  They will be able to think critically about the curriculum and how it relates to their lives outside of the classroom. They will be able to communicate effectively with their peers, their teachers, the community, and the world.  They will be able to collaborate and work well with others.  And they will be creative in sharing what they have learned and their passions.


My Mission Statement:The mission of Ms. Hero’s classroom is to provide a learning environment where all students will succeed, are a valued part of the community, are prepared for their futures, and become lifelong learners.


You may have noticed that I didn’t specifically mention technology in my vision or mission. While I am a huge fan of integrating technology in my classroom, and have spent the last two years as an Instructional Technology Specialist, tech isn’t my main focus.  My focus in the classroom is and has always been the students and their learning and growth. Technology will be a big part of my classroom, but technology is just a tool that when used at the right time, can help students become 21st century learners.

Saturday, January 9, 2016

Spotlight Apps: Point Students in the Right Direction

When projecting websites or slideshows to students, sometimes you need to make something stand out.  Some of you may have seen me use a spotlight tool to draw attention to specific parts of the screen in my PD Sessions or on screencasts.  I have been using Mouselight for my Mac for a few years and just finally found a PC version of a mouse pointer/spotlight.

Unfortunately, these tools are not free. I have found that spending that little amount out of my pocket has been worth it, for the amount of times I have used it, with students in class, as well as with teachers in PD workshops.  

Here are two different versions of a spotlight for each operating system.  (Sorry, there is nothing that I know of that works with Chromebooks, yet.)

Mac:  Mouselight $0.99  


PC:  Pointerfocus.com $9.95  (You'll get a free 10 minute trial to test it out)


Wednesday, November 18, 2015

Breaking Down Walls to Increase Teacher Confidence When Integrating Technology

I've been an Instructional Technology Specialist (Tech TOSA) for the past year and a half.  In my role, it is my job to help train and coach teachers in my district to integrate technology into their curriculum to enhance instruction, transform student learning, and meet the CCSS standards related to technology.  While many teachers are excited to use technology in the classroom, and the Chromebook carts are being checked out and are in constant demand, many more teachers are still not comfortable using technology in the classroom.  Many lack the confidence to use technology with their students.

There seem to be a variety of reasons why teachers are afraid to use technology with their students.  Some feel that they don't have a grasp on using the technology themselves, and don't want to feel that they are not in control in their classrooms, or not the expert of everything.  Some have had bad experiences in the past with the wifi or technology not working, and don't want to run into problems again.  Others are afraid of classroom management issues, such as students being off task and texting, surfing the web, etc.  All of these issues seem to lead to the idea of mindset.  

My goal is to slowly change hesitant teacher's mindset about using technology in the classroom.  I want them to understand that the teacher doesn't have to be an expert on the technology tools; they can rely on students to be the experts and share with their classmates.  And while the network may go down or tech may fail, it is important to always have a plan B, or even a plan C, because non-tech lessons may not work either, and you always have to have a fallback plan.  And lastly, students will always be tempted to get off task if they don't have an engaging assignment.  Before computers, smart phones, and texting, students passed notes.  The same classroom management skills and strategies that you use in a class without technology, are still important in a class with technology.

Mark Anderson, @ICTEvangelist
A few weeks ago, I saw this diagram "Teacher confidence in use of technology" by Mark Anderson in my Twitter feed.  This diagram perfectly describes the different levels teachers are at in my district.  I feel like many have moved on to the mastery, impact, and innovation levels.  But there are still a lot more at the survival level.  These teachers are scared to use technology with their students, and don't seem to be able to move up to the next level.

To get to mastery, the simple answer is that the teachers should receive training and play and practice with the different tools.  Then that would increase their comfort and confidence.  But many seem stuck.  They know they need practice, they know they need to sign up for training, or one on one appointments, but they don't always do that.  They have built up a wall of fear, that they have a hard time climbing over it.

How can I break down the walls that these teachers have built?  How can I change their mindset about technology and alleviate their fears?


I'd love for administrators to model using different tech tools in staff meetings, and to have technology purposely integrated into all professional development my district offers, not just the tech PD offerings.  I feel that this would help hesitant teachers start to see the benefits that using technology could provide to learning.  But this is a challenge for me in my district right now, and I feel like I'm making baby steps in these areas, but it's not enough.  Yet.

Another thing that I just started to try is to work with teachers to "crash their lesson".  (This ideas is based on the Yard Crashers TV show.)  In this process, I meet with a teacher and look at a lesson that they have already used in the past, that they would like to improve, and we find a way to use technology to enhance the lesson to meet their content goals and standards.  We plan a revised version of the lesson, and then I go to their class to co-teach the lesson or just help out and provide support while they teach it.  Afterwards, we reflect on the process and share what we've done with the whole staff as part of a weekly Tech Tip blog post.  It's starting to get other teachers, who are at the Survival level, to book appointments with me to brainstorm ideas to include technology in their lessons.  I'm hoping that this continues and spreads by word of mouth to other teachers.  

Do you have any suggestions to help teachers make that huge jump from survival to mastery?  How do you break down those walls that have been built?  Please share your ideas in the comments section below. I'd love to see what has worked for you.

Saturday, November 14, 2015

Updating a Vocabulary Lesson - 10 Important Words

One of my favorite vocabulary lessons, that I learned early in my teaching career, is called "Ten Important Words".  It is a great way for students to find meaning of words based on the context of the text, allows students to judge the importance of the words, collaborate and then summarize the text.  It was a little hard to manage some of the whole class collaboration.  Adding a little technology simplified the entire process, and allowed more class time to be spent on deeper conversations around the meaning of the words and the text.

The Original Assignment:
When assigning a short reading, students would first read the text, and then go back and highlight what they believed were the ten most important words.  I generally assigned this for homework, and the text size was never more than a few pages.  It could be an article or a small section of a chapter. 
Then, in groups of four, students would have to come up with one list that they all agree upon.  So students would go through and have to convince the their group that their words are more important than others.   It was so awesome to see students "fight" and "argue" for their words.  In their "arguments", they were using evidence from the text and comparing and contrasting the value of the word in making meaning of the text.  (They don't really fighting, but they do get really into discussing and advocating for their own words.)

Then, after the group decided on their one list, we would combine them and decide as a class what the test most important words were.  Next, students would define the class list of words and then write a one paragraph summary of the text, using those ten words in context.

As you can imagine, it was challenging to collect the words from each of the class groups and agree on the class list of the ten most important words.  So I decided to take advantage of some technology tools and using the student's cell phones.

Integration of Technology
I set up a simple Google Form that just had one question for the groups to fill out, list your 10 important words.  One student in the group would pull out their cell phone and type in their list.


I would then go to the Google Sheet that contained the form data, and highlight all of the words typed in by my groups.
Next, I would go to wordsift.com and paste in the list of words generated by my student groups.  After pressing "sift", I get a word cloud, where the most used words are bigger than the others.  I can then click "create workspace" and drag the 10 most important words to one spot.  This process takes only a few minutes to do and saves a lot of class time.  Now, I can have a discussion with the class and ask why some of their words didn't make it to the class list, and discuss the definitions and the reading, before the students write their summaries. 


Other Uses for Word Sift
You can copy and paste in entire texts, poems, stories, speeches, etc.  When you sift, you not only get a word sift showing the most used words and a workspace, but can sort alphabetically or by common to rare words.  When you click on a word, you will find, images, and a visual thesaurus.  This can really help students understand and make meaning of the text or key ideas.

Students can even enter in their own writing and see if they use some words too much, or students can enter copy and paste their textbook in to see the big concepts or ideas.


Friday, November 6, 2015

Email Check In After Providing Professional Development

A few weeks ago, at Fall CUE, I attended Kevin Fairchild and Jessica Lura's session "Strategies for Teaching Adults".  I had participated in the Leading Edge Certification course for Professional Learning Leaders with them last spring and enjoyed learning with them.  I was excited to see that they were leading a session together at the conference.  

Their presentation was more of a discussion than a presentation, which promoted a lot of group conversations and sharing.  One of the things Kevin shared in the session really stuck with me, and inspired an idea.  When we were discussing how to know if our PD had an impact on the participants, and if they used what we taught them, Kevin shared a strategy that he has used.  Kevin sends out emails after the event, and then, if he remembers, another one a few months later.  

I normally send an email right after the PD, but never thought of sending one out later, to check in on the participant's progress.  I know I wouldn't consistently remember to send an email later in the year; I'd never be able to keep track of everything.  I thought that there had to be a way to automate that process.  I immediately began thinking of how I could use Google Forms and some Add-Ons, copyDown and formMule, to make this work.   

I just got a chance to try this out and set it up for the professional development I offer at my district.  In this post, I will describe how I set it up in case you want to use this for any PD you may offer.


Summary of Automation Process


  • First, I created a Google Form for participants to sign in when they attend a PD session.  It collects their name, email, and title of the session.
  • On the spreadsheet that is created from the form submissions, I added a few extra columns, with formulas.  
    • One column includes the date of a week after the PD, which has a formula that auto adds that up referencing the timestamp.
    • Another column that includes a date three months after the PD, with a formula to calculate that, referencing the timestamp.
    • And two more columns that reference those two dates I just created.  The formula in these columns looks at the previous column and if the date of the one week column equals today's date, it will write "TODAY" in the column, and if the date of the three month column equals today's date, it writes "TODAY" in that column.
  • Next, I ran the add-on copyDown to copy down these formulas into each row on form submission.
  • Finally, I used the add-on FormMule to run each morning.  It is triggered to send out one of two emails.  If the one week column says "TODAY", it will send the one week email thanking participants, sending them the link to our PD resources webpage, and asking if they need any support.  If the three month column says "TODAY", an email will be sent asking if they implemented what they learned and offering support if they need help.

Video Instructions

This video is about 20 minutes and walks you through the entire process to set up one week and three month check-in emails.  I am so sorry that it is this long, but you can jump ahead to the section you need, using the timeline if you open it up on YouTube, or on the table of contents "page" at the beginning of the video.


Spreadsheet Formulas and formMule HTML

Here are some of the formulas and HTML code I used, so you can copy and paste them into your own sheet.

Spreadsheet Formulas:
  • To convert the Timestamp (with date and time) to the date:  =to_date(int(A2))

  • 1 week reminder (7 days):  =B2+7  
  • Today:  =if(H2=today(),"TODAY","")

  • 3 month reminder (91 days):  =B2+91  
  • Today:  =if(J2=today(),"TODAY","")
(Where B2 = cell date, and H2 = cell that has the one week date (or J2 has the 3 month date formula).  Depending on what information you are collecting in your form, your column letters may change.)

HTML for FormMule:

  • HTML website link:  <a href="https://sites.google.com/a/seq.org/suhsdpd/">SUHSD PD Website</a>
  • HTML email link:  <a href="mailto:mhero@seq.org" target="_top">Melissa</a>

(What is in blue is what they will see in the email, and it will be hyperlinked to what is in red.)

Monday, November 2, 2015

Lesson Crashers: Psychology - Functions of the Brain

I wrote up this blog post for my district staff, but decided to share it on my personal blog too.  I am hoping to get more teachers to book appointments with me for instructional technology, rather than seeing me as just their tech support to help them with their gmail and gradebook.  I am hoping that by starting "Lesson Crashers" I will get more teachers interested in incorporating technology into their instruction.

________________________________________


I must admit, sometimes I watch a little too much TV, especially when I should be cleaning my house, preparing a lesson, etc.

But some TV can be a good thing - educators can get some great ideas for lessons based on TV shows.  There are hundreds of Jeopardy style review games and templates on the web.  The Exploratorium Teacher Institute runs an "Iron Science Teacher" web show each summer based on Iron Chef where teachers create science lessons using a secret "ingredient."  Jennifer Kloczko, an administrator from Natomas, got inspiration for the Professional Development she leads from Food Network's "Chopped."

Yard Crashers
This summer, I watched a lot of HGTV and one of my favorites was Yard Crashers.  The main premise of the show is that some home owners are shopping at a Home Depot type store, in the garden section, and the host sneaks up on them, volunteering to design and landscape their yard.  The show provides the designer, supplies, and a construction/landscaping crew, and the home owners pitch in too.

Lesson Crashers
This gave me the idea to create my own spin on the show called "Lesson Crashers."  The idea behind "Lesson Crashers" is that I would help a teacher reinvent a lesson, integrating technology.  I'd meet with the teacher, we'd discuss a lesson or project that they have used before, and figure out what new goals they have or hopes for improvement.  Working together, we'd then brainstorm some ideas on how we can meaningfully integrate technology to enhance the lesson.  When the teacher then teaches the lesson, I can provide support if needed (ex. coteach, observe, etc.).  Then, we'd debrief the lesson, and come up with next steps.

Here is the first Lesson Crasher lesson.  Michelle McKee, a psychology teacher at Carlmont, graciously volunteered to test this out with me, and we wrote up a description of the process.  I am hoping that this lesson will spark some ideas that you can use in your own classes.  

Monday, October 26, 2015

Best Practices for Teacher Management of Chromebook Carts


To best protect the Chromebooks and ensure that they last as long as possible for you to continue using, here are some best practices.  


With repeated use, students will quickly learn the procedures, and check in and out will be much smoother.

  1. Assign each student a number.  That is the Chromebook they will ALWAYS use in your class, and the Chromebook they are responsible for.
    • Print out a list for each class that you pin on the wall above the cart, in case they forget their assigned computer.
    • Have students write down their number in their notebook or planner.  (Or print out labels for each student with their name and number to put on their class notebook, planner, etc.)
    • If new students join your class, just assign them an empty number.  Don’t go re-organizing or alphabetizing your list after you’ve assigned numbers.  The students will get confused.
  2. Distribute Chromebooks.  If cart is open, students know to pick up their Chromebook on the way into class.  If it’s closed, they are not to grab one.
    • Make sure students only get their Chromebook, not ones for friends too. When they carry too many, they drop them.
    • Students should use two hands to carry a Chromebook, and never have them open when they are walking.
    • Students should double check that their Chromebook is actually the right number, in case the person before them put it away in the wrong spot.  Remember, they are responsible for their assigned number.
    • Stand near the cart or door to make sure no chromebooks wander out of class.
    • If you are having students get Chromebooks after the beginning of class, call up students in groups.  Ex.  1-10, 10-20, 20-30, etc.
  3. Check the Chromebooks.  
    • If there is ANYTHING wrong with the Chromebook, the student should tell you right away.  
    • That way you know that it was broke the period before, and know which student is responsible.
    • Notify the appropriate AVP immediately if a student broke a device.
  4. Sign In.  Students should be sure they sign in to their GAFE account.  
    • If they open the device, and it’s already on the internet, the person before them is signed in.
    • Have them sign out the other person, and sign in themselves.
  5. Student care of computers.
    • No food or drink next to the devices. Keeping the units clean will help extend their life.
    • Use the device on a flat surface. Using the device on your lap increases the risk of damage.
    • Do not attach personal accessories to the Chromebooks. Headphones can be used when directed by staff. 
    • Not charging student cell phones through the USB port will extend battery life during the day.
  6. Sign Out.  When done, make sure students sign out.  
    (at the bottom right corner of the screen) 
  7. Students should return their Chromebook in the last few minutes of class, NOT after the bell rings.
    • Only have students plug in Chromebooks at the end of the day, not each period.  It takes up too much time.
    • Call up students in groups to put away their Chromebook, and be sure they put it in the correct slot.  1-10, 10-20, etc. 
    • Make sure each computer is put away (and plugged in if this is the last period) and close the cart door BEFORE you let any students leave the class.
    • You don’t want to sit and plug in all 35 chromebooks, so make sure the students do it for you.
  8. Don’t allow students to leave the class when Chromebooks are out.  
    • This is how Chromebooks are stolen.  Even if you collect the Chromebook from the student who is leaving the room, that doesn’t ensure that they didn’t put another one in their backpack before leaving.  
    • Make sure all Chromebooks are accounted for.
  9. Never leave the cart unlocked when you are not in the room.
  10. Make sure the cart is locked, plugged in, and charging at the end of the day.
    • Please remember that the cart is checked out to you, the teacher, not the students.  So you are ultimately responsible for the contents.  
    • Be sure everything is plugged in and in the correct spot, before the cart moves on to another teacher.  You wouldn't want to open the cart and find that half of the Chromebooks aren't plugged in and charged.
    • Devices should not be used when you are not there.  Your class should not be using the carts when you have a substitute teacher.
  11. Notify your school’s site tech regarding damage or malfunction of Chromebooks
  12. Moving Carts
    • Only teachers should move carts, do not allow students to move cart around the campus. 
    • Unplug power connector, from wall, before moving, and wrap the cord around the cord management.  
    • When transporting Chromebooks without cart, do not stack more than 4 books on top of each other or the screens will crack.

Friday, March 13, 2015

Leading Edge Certification, Blended & Online Teacher: Module 6.3 Reflection

Module 6.3 Reflection

Prompt:

This module has explored the use of technology tools for both formative and summative assessment. As you think about how you will implement formative and summative assessments in the online and blended environments:
  • What are some of the factors you need to consider?

Response:

In any class, online, blended, or in person, a teacher needs to carefully consider what tools and strategies to use to implement formative and summative assessments.

I believe that the first thing a teacher needs to do is figure out the learning goals for the unit.  If you do not have a clear set of goals and objectives, the assessments will be useless.  As a teacher, you need to provide scaffolded instruction and activities to help a student meet and master those goals.  As students are moving along through the unit, a teacher must use formative assessments to see where students are at, make any modifications or changes to the lesson plans, provide feedback to each student about their learning, and allow students to use that feedback to grow as a learner.  Each step of learning and growth should be celebrated.  Then, at the end of the unit, there should be some sort of summative assessment where students can demonstrate and apply their learning.

Tuttle's Stages or Formative Assessment.png
Harry G. Tuttle's Stages of Formative Assessment
Formative assessments need to be provided to not only gauge where students are or to guide a teacher’s future lessons, but to also provide feedback and additional learning and support for students.  In a blended or online course, I like to select tools that allow students to check their knowledge, but also provide immediate feedback, such as Quizlet, Socrative, or even Google Forms using the Flubaroo add-on.  It’s also important to check higher levels of student thinking.  Online tools such as Collaborize Classroom, Padlet, or Today’s Meet allow students to share their thoughts with others and get feedback from their teacher and classmates.  

At the end of the unit, when I select a summative assessment, I want my students to apply what they learned and create something to demonstrate their knowledge about the topic.  I like to give students a choice in tools so that they feel comfortable and can really show me what they know, and be creative at the same time.  Some tools that my students use are iMovie, WeVideo, iStopMotion, Powtoon, and Explain Everything.